If you are also interested in making time-lapse recordings (if anyone does not know what this actually is, I suggest that you look at the article under the title "time-lapse"), you, like me, have stopped when it is necessary to make a studio recording. You can improvise like I did, but the results are worth it. What usually goes wrong? Most often the problem is in the following things:
– The scene is not completely isolated from external light, so we get flickering in the recording
– The timer is not optimized so the recording is not smooth
– The battery in the timer or camera runs out before it's over
– It is difficult to coordinate the lighting of different lights (for growth, if we have a plant in the scene, lighting and flowering)
After unsuccessful attempts and improvisations, I decided to tackle it a little more systematically and professionally.
STUDIO
To begin with, I set up a closed environment so that the influence of external light is as small as possible or practically non-existent. I achieved this by using a closed mini studio made by many manufacturers. Chinese products lead the way, which also have very favorable prices. I chose the Godox studio myself. Despite their low price, their products are very robust and well made. I chose a model with a dimension of 60 x 60 x 60 cm, which is perfectly sufficient for my projects. It is a system where we assemble a rod frame and then dress it in the attached "skin" with the help of zippers. This wrap is completely opaque and has a silver interior for better light efficiency and diffusion. There are also cleverly designed openings on the casing, through which the camera can be seen inside or the wires for lighting can be pulled through. Openings are also closed if necessary. The set also includes a set of 3 elongated panels on which high-brightness LEDs are installed. These lamps can be placed anywhere in the studio and are attached to the frame/frame itself. Each panel with lights can be adjusted separately via the potentiometer via the attached controller, thus setting the desired lighting.
RECORDING SYSTEM
In previous, more improvised setups, I used a manual intervalometer, but it turned out to be a bit wonky. As it is basically a portable device and is powered by 2 AAA batteries, it needed its own power supply to ensure continuous operation throughout the duration of the recording. This entailed the search for a suitable source, because the intervalometer operates in a narrow range of 3-4 V DC voltage. In addition, I had to rework it and re-solder the contacts inside... Another problem arose with the power supply of the camera itself, which also needs a continuous power source. I solved this with a "dummy" battery powered by a USB plug, which can be easily plugged into a sufficiently powerful charger for mobile devices. The third problem is the control of the LED panel, which is equipped with special diodes and provides adequate light for plant growth (if you are filming something like that). The fourth challenge is to set the lighting so that it is active only when the camera is activated, because I did not want the lights to burn continuously, because this affects the consumption of electricity and the lifetime of the LED panel.
Everything must then be connected into a system that will (chronologically) carry out the succession of tasks:
1. Turned on the grow light.
2. Turned off the grow light after a certain amount of time (so that the purple color emitted by this light is not on the video).
3. Turned on the scene lighting.
4. Triggered the camera to take a picture.
5. Turned off the scene lighting.
6. Turned the grow light back on.
7. This cycle repeats for 12 hours (vegetative cycle for a plant).
8. Disable the lighting of the growth lamp at night (or the next 12 hours) and extend the interval between shots for this period (because growth is slower).
ARDUINO?
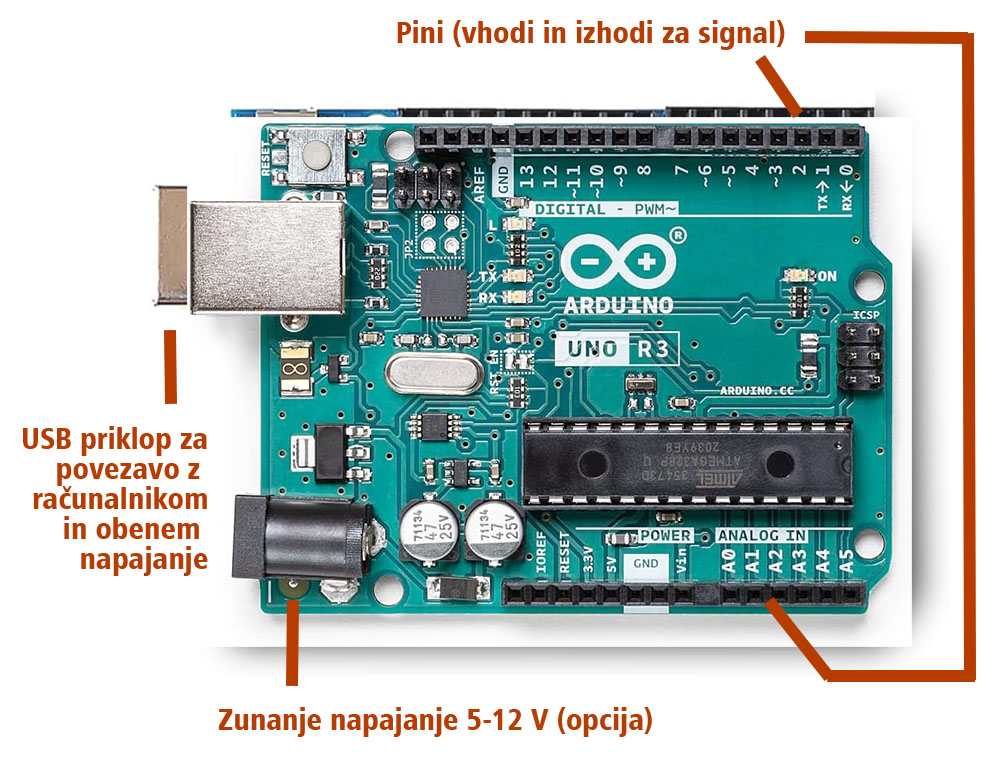
Everything is difficult to implement with standard intervalometers and existing technology, so I looked for a new solution and that is - Arduino. For those who do not know what Arduino is, let me briefly describe it. It is a small printed circuit that contains a microcontroller and quite a few outputs (pins) that can be connected to various devices and with the help of a short and simple code in C++ we can determine what they will do. Arduino is widely used among electronics, robotics or process engineering enthusiasts. It is cheap, easy and with it we can control lights, measure voltage, temperature, humidity, servo motors through sensors, create a system for automated watering of flowers, etc... The controller works like a tiny brain that does what we tell it to and sends electrical signals to pin (output). We can stream online for free code editor which is then uploaded to the device itself via the USB port. It's all very easy and fun. For learning without "hardware", there is also a free graphics simulator on the site TinkerCad.
Like this:
Since the Arduino itself cannot control high-voltage devices, such as 220 V lamps, I also ordered a board from Amazon for a few euros, which contains 4 relays that are controlled by a microcontroller via a wired connection.
I then connected everything in a network that used 3 of the 4 relays available. The first relay turns on the grow light, the second the lighting, and the third turns on the camera. When everything was properly connected with wires, I bought a suitable plastic case, where I crammed everything together. I also attached a cinch outlet to the case for the cable that will trigger the camera and then drilled a hole to access the USB port that serves as power and a service port for uploading code.
That's all as far as the physical structure is concerned, and then it's necessary to program what we want the system to do. In the code in the "setup" section, we specify the connectors and the places where they are connected. We also set constants for time delays (in milliseconds). Then, in the "loop" section, we find out what the program should do with it. Here is code, which I used. Unfortunately, I'm not an expert in C++ programming, and the solutions will seem a little "homemade" to some. The fact is that now I can change the settings at will whenever it suits me, I just enter other numbers for the values of time delays, activations, etc...
EQUIPMENT LIST
Here's a list of the gear I used and a link to purchase if you're tempted:
– Mini studio Godox
– Arduino UNO
– Relays
– Cable for connection to mains voltage (220 V)
– 2 x cable for connecting lighting and grow lamps
– USB cable to connect the Arduino and the computer (power supply and code upload)
– Continuous powering of cameras via USB
– Wire connections between Arduino and relays
– Clamps for connecting cables (Wago)
– Housing
You also need a cheap soldering iron to connect the wires to the various connectors (for Arduino, just wire connections that you insert into the pins without soldering will suffice).
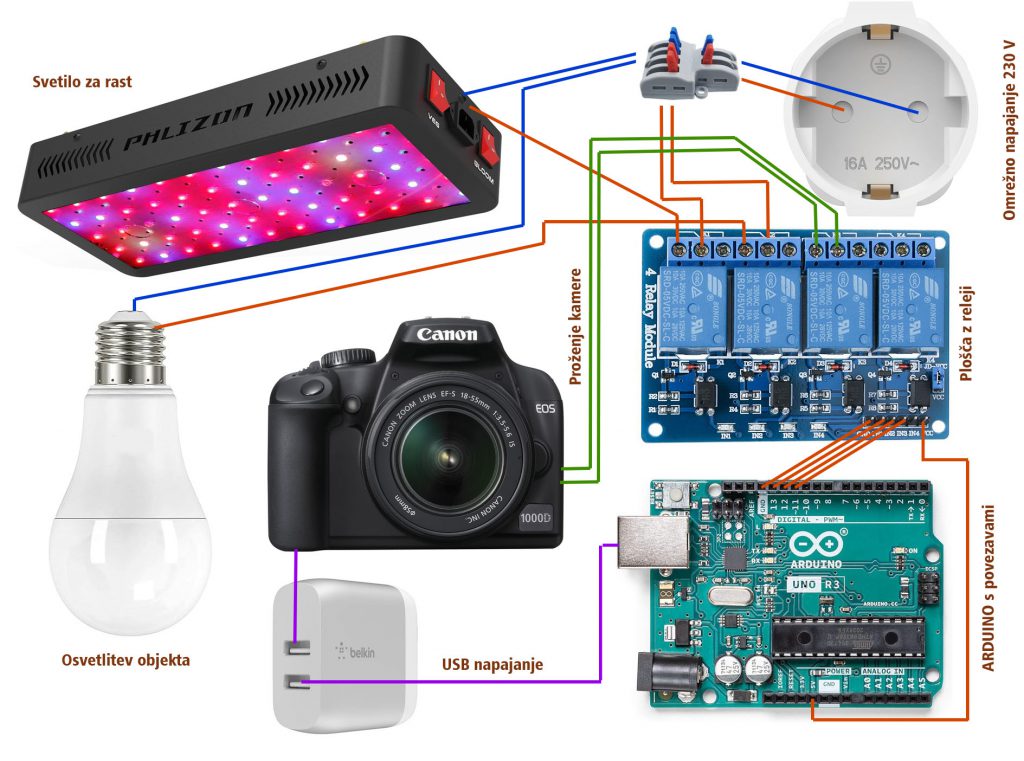
Here is a graphic diagram of how everything is connected:

